
SaaS vs PaaS — Which One Do I Need?
ATP360 is available in two deployment models: SaaS and PaaS. This guide covers both — start with the overview below to confirm which model applies to you, then jump to the relevant section.
|
SaaS |
PaaS |
|
|
Availability |
Trial only — not currently available to purchase |
Available as a trial or a full paid licence |
|
Hosting |
Fully hosted and managed by WorkspaceDNA |
Deployed into your own Azure subscription |
|
Setup |
Sign up and start testing — no Azure deployment required |
Deploy via Azure Marketplace into your own tenant, then complete setup |
|
Infrastructure & maintenance |
Managed entirely by WorkspaceDNA |
Managed by you, within your own Azure environment |
|
CUA Workers |
Provided and controlled by WorkspaceDNA — the apps available on them are fixed by us |
Installed on your own devices — the worker sees whatever apps and environment you install it into |
|
Best for |
Quickly getting a feel for ATP360 with minimal setup |
Real-world testing in an environment that closely mirrors your actual production estate |
Because WorkspaceDNA controls which apps are installed on the SaaS-provided workers, SaaS is well suited to trying out ATP360 and understanding how it works — but it isn't representative of your own application environment, so it's not a substitute for real-world testing. PaaS, where the CUA Worker runs on your own devices, is the better fit once you want to test against the actual apps and configuration your organisation runs in production. This is also why SaaS is trial-only for now — it's intended as an evaluation path rather than an ongoing production testing environment.
Regardless of which model you choose, registration starts in the same place: go to WorkspaceDNA.com/ATP360 and sign up for a trial or licence, selecting SaaS or PaaS as appropriate.
- If you selected SaaS, see Getting Started with ATP360 (SaaS) below.
- If you selected PaaS, see Deploying ATP360 (PaaS) below.
Getting Started with ATP360 (SaaS)
[Placeholder — SaaS getting started content to follow.]
Deploying ATP360 (PaaS)
This section walks through deploying ATP360 into your own Azure subscription via Azure Marketplace, from prerequisites through running your first test, read the guide or watch the video to see how it is done.
1. Prerequisites
Before starting the deployment:
- Register for ATP360 at WorkspaceDNA.com/ATP360 and sign up for a free trial (or purchase a licence).
- Make sure to select PaaS during sign-up.
- Sign up using the Microsoft account you intend to log in with later — your licence is tied to this account.
- Review the Architecture, Security & Pre-Deployment Guide (KB article) before deploying. In particular, confirm that the required resource providers are registered on the target subscription:
- Go to the subscription in the Azure Portal → Settings → Resource providers.
- Locate each required provider (e.g. Microsoft.App) and confirm its status is Registered. If not, select it and click Register.
- Refer to the Architecture guide for the full list of required providers.
- Pre-create the required resource groups (see Step 2 below) — at minimum, the resource group that will host the managed application itself should already exist.
2. Deploy ATP360 from Azure Marketplace
-
- From the Azure Marketplace listing for ATP360, click Get It Now. This opens the Azure Portal (sign in if prompted).
- Select the subscription and plan to deploy to (there is currently only one plan available), then click Create.
- You'll be asked for two resource groups:
- Managed application resource group — this holds the managed application resource itself. You can select an existing group or create a new one at this step
- Resource group for underlying resources — this is where ATP360's actual Azure resources (container app, etc.) are deployed. You must create a new resource group to complete this step (this is a Microsoft Marketplace limitation).
- Click Next to configure virtual network settings or hit Review + Create to have Azure create a new private vnet
- You will be asked for four things - see the Virtual Networking section below for a guide on the networking requirements
- Virtual network
- Container Apps Infrastructure Subnet
- Private-endpoint subnet
- Private DNA Zones
- Click Review + Create, review the summary, then click Create.
- The deployment will run for several minutes. Once complete, you'll see a Deployment succeeded confirmation.
Virtual networking
An existing VNet can be used - a new one is not required. The deployment wizard asks for this choice.
On the existing-VNet path, two subnets must be created before deploying, because the deployment creates no network resources itself:
- A Container Apps infrastructure subnet, at least /23, delegated to
Microsoft.App/environments - A private endpoint subnet with private endpoint network policies set to Disabled
The wizard checks subnet size only, so a missing delegation or the wrong policy will fail the deployment.
There is also one step after deploying: assign the Network Contributor role to the managed identity named atp360-bootstrap-id-... on both subnets. Without it the install can succeed but later automatic updates fail. That identity only exists once the first deployment has run, which is why it cannot be done in advance.
If they let the deployment create a new VNet, none of the above applies - they only need to peer it to reach their test machines.
The firewall rules in the prerequisites and this subnet work are separate things. Allowing the outbound addresses does not create or configure any subnet.
3. Locate Your Deployed Resources
- Open the completed deployment and navigate to the managed resource.
- From there, open the managed resource group — this contains the actual deployed resources, including the Front End Container App.
- Open the Container App and copy its Application URL. This is the URL you'll use to access ATP360. It is worth bookmarking this URL for future use.
Note: The first load of the app can take a little while.
4. First Sign-In
- Navigate to the Application URL from Step 3.
- Sign in using the same Microsoft account you used to register your ATP360 trial/licence — this is the account your licence is associated with.
- On successful sign-in, you'll land in the Setup Wizard.
5. Setup Wizard
5.1 Install the CUA Worker
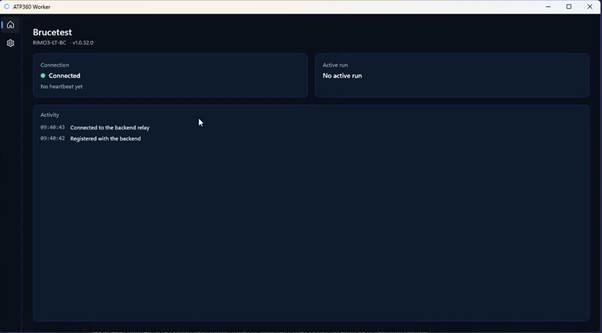
ATP360 runs tests on a device via a CUA Worker — a lightweight agent installed on the machine you want to test on. The worker communicates on port 443 outbound from the worker so you may need to configure device firewall rules to allow for this depending on your network configuration.
- In the wizard, click Download to get the CUA Worker MSIX package.
- Install the package on the target device (deploy however suits your environment).
- Copy the pairing key shown in the wizard.
- Open the installed CUA Worker app, paste the pairing key, and click Pair.
- Once paired, the worker will show as connected in the wizard and will appear in your workspace's list of registered devices.
5.2 Connect AI Engines
ATP360 uses external AI providers to power test generation and execution. Connect the following API keys:
|
Provider |
Required? |
Purpose |
|
OpenAI |
Required |
Powers the parser and orchestrator layers |
|
Claude (Anthropic) |
Required |
Powers the worker layer |
|
Gemini |
Optional |
Required only if you want to parse video into test cases |
Paste each API key into the wizard — ATP360 will automatically test the connection to confirm the key is valid.
5.3 Configure Model Layers
ATP360 is made up of three logical layers, each of which can use a different model:
- Parser layer — converts prompts, documents, and videos into structured test cases.
- Recommended: latest OpenAI model (e.g. GPT-5.6 at time of writing) for text/document parsing.
- For video parsing specifically, Gemini is required (e.g. Gemini 3.1 Pro).
- Orchestrator layer — the "brains" of the operation; turns test case steps into the clicks and actions the worker executes.
- Recommended: latest OpenAI model, GPT-5.6 at the time of writing.
- Worker layer — the "hands on keyboard"; actually performs clicks, typing, and navigation on the device.
- Recommended: Claude, preferably an Opus-tier model (e.g. Opus 5) for best reliability.
- Claude Sonnet-tier models will work but are less capable.
These are starting recommendations — all model selections can be changed later, so feel free to experiment with what works best for your use case.
5.4 Run Your First Test (Optional, from the Wizard)
The wizard offers the option to submit a document, video, or prompt to generate and run your first test immediately. You can also skip this and run your first test afterward from the main platform (see Step 6).
6. Running a Test from the Platform
Once setup is complete, you can run tests at any time from the Test Now button:
- Click Test Now.
- Choose your engines/workers and provide input as a document, prompt, or video. For example, a simple prompt: "Open Word, type Hello World!"
- Click to extract test steps — ATP360 uses your configured parser model (e.g. OpenAI) to turn this into structured test steps.
- Click Run Test.
While the test runs, the interface shows:
- Test steps (left) — with the currently executing step highlighted.
- Action log (right) — a real-time, fully auditable log of what's happening.
- Live screenshots (centre) — of the device under test.
- Token usage, run cost, and duration — shown at the top of the screen.
On completion, you'll see a pass/fail result, the total cost of the run (e.g. $0.36), and a full audit trail of everything that occurred during the test.
Support
If you run into issues during deployment or setup, contact: technicalsupport@workspacedna.com