
Before you start
Use this guide when an ATP360 CUA Worker will not connect, shows as offline in the ATP360 front end, or stops picking up work.
The CUA Worker talks to ATP360 outbound over HTTPS on TCP port 443. It needs no inbound ports and no public IP. If 443 outbound is blocked anywhere between the Worker machine and the internet, the Worker cannot register or check in.
Work through the steps in order — each one rules out a layer before you move on to the next.
Step 1 — Check outbound internet connectivity on 443
The Worker communicates on port 443 outbound over HTTPS, so the first thing to confirm is that the machine can reach the internet at all, and specifically on 443.
On the Worker machine:
- Open a browser and load any external HTTPS site. If nothing loads, the machine has no internet access and nothing else in this guide will help until that is fixed.
- Test 443 specifically from PowerShell:
Test-NetConnection -ComputerName <your-atp360-host> -Port 443TcpTestSucceeded : True means the path is open. False means something is blocking it — firewall, NSG, proxy, or the corporate egress filter.
Things that commonly block it:
- Windows Defender Firewall or a third-party endpoint security product
- A corporate proxy that the Worker account is not configured to use
- TLS inspection / SSL interception breaking the handshake
- Azure network security rules — see Step 2
If the browser works but the PowerShell test fails, the block is specific to that destination or port rather than general internet access.
Step 2 — Azure VMs: allow 443 outbound in Network settings
If the Worker is running on an Azure VM, depending on your company policy, the default rule of outbound connectivity being allowed maybe disabled, causing connectivity issues. This is the most common cause of a Worker that installs fine but never connects.
Check, and if necessary add, an outbound rule allowing 443:
- In the Azure portal, open the VM.
- Go to Networking > Network settings.
- Look at the outbound port rules on the attached NSG. If there is no rule allowing TCP 443 outbound, add one.
- Click Add outbound port rule and complete it as shown below.
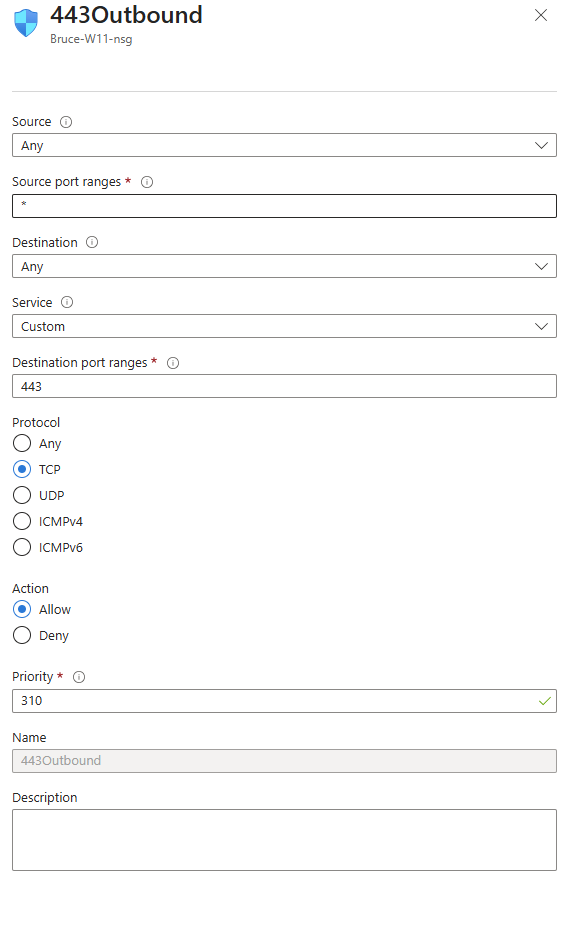
The settings to use:
|
Field |
Value |
|---|---|
|
Source |
Any |
|
Source port ranges |
* |
|
Destination |
Any |
|
Service |
Custom |
|
Destination port ranges |
443 |
|
Protocol |
TCP |
|
Action |
Allow |
|
Priority |
310 (any free priority below the deny rules) |
|
Name |
443Outbound |
Save the rule, then re-run the Test-NetConnection check from Step 1 to confirm the path is now open. Changes take effect within a few seconds — no VM reboot is needed.
Note: if your organisation routes VM traffic through a firewall appliance or forced tunnelling, the NSG rule alone may not be enough — the same 443 outbound allowance will need to exist on that device too.
Step 3 — Check the Worker is paired correctly
If network connectivity on the VM is working, the next thing to rule out is the pairing between the Worker and the workspace.
- On the Worker machine, open the ATP360 CUA Worker app and go to Settings.
- Check the Workspace shown at the top. It must be the workspace you expect the Worker to report into. A Worker paired to the wrong workspace will look healthy locally but never appear where you are looking for it.
- To rule out a stale or broken pairing, unpair and pair again. Click Unpair, then pair the Worker using a fresh pairing code.
Where to get the pairing code: in the ATP360 front end, go to Settings > CUA Workers and click Download for Windows. The pairing code is displayed there. Generate the code in the workspace you want the Worker to live in — a Worker can only be moved to another workspace by unpairing and pairing again with a key generated in that target workspace.
After re-pairing, give it a few seconds and check the Worker appears as connected in Settings > CUA Workers in the front end.
Step 4 — Check the logs
If the first three steps have not resolved it, the logs will tell you what the Worker is actually attempting and where it is failing.
Logs are written to:
C:\ATP360\logsTo capture the full picture:
- Open the ATP360 CUA Worker app and go to Settings.
- Under Logging, select Detailed — adds step-by-step detail for diagnosing a problem. This takes effect immediately, no restart needed.
- Close and reopen the ATP360 CUA Worker so the startup and connection sequence is captured in full at the Detailed level.
- Reproduce the problem, then open the newest log file in
C:\ATP360\logsand look for errors.
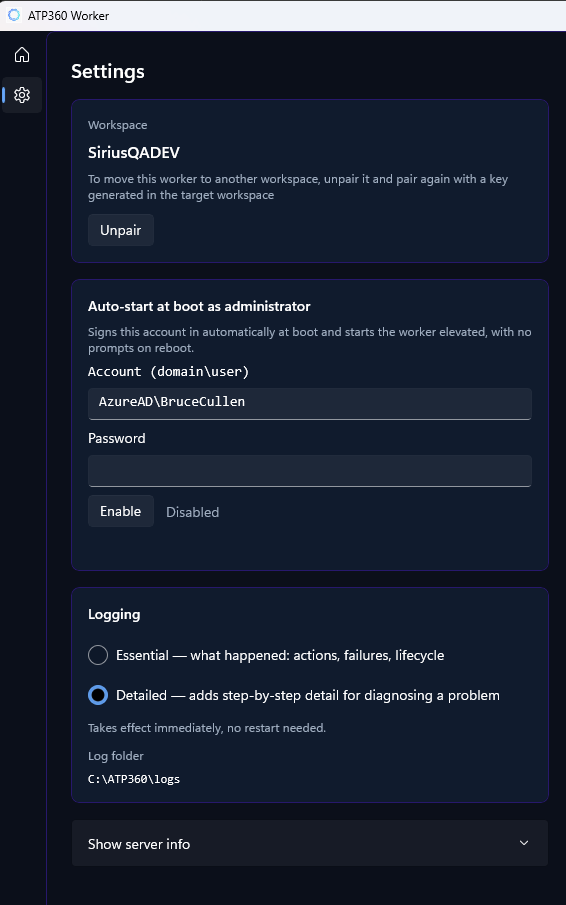
What to look for in the log:
- Connection or socket errors, timeouts, and TLS/certificate failures — these point back to Steps 1 and 2
- Proxy or name-resolution failures
- Authentication or pairing rejections — these point back to Step 3
Switch logging back to Essential once the issue is resolved, to keep log volume down.
Still not working? What support needs
If you have worked through all four steps and the Worker still will not connect, raise a support ticket and include the following — without these, support cannot progress the ticket:
- The Detailed logs from
C:\ATP360\logs, captured after switching logging to Detailed and restarting the Worker (Step 4) - The workspace name the Worker is paired to, and whether unpair/re-pair was attempted
- Where the Worker is running — on-premises, Azure VM, or another cloud — and whether an NSG or firewall rule change was made
- The output of the
Test-NetConnectioncheck from Step 1 - Roughly when the problem started, and whether the Worker had previously connected successfully