
ATP360 can run a test on a Windows 365 for Agents Cloud PC from a pool in your own Microsoft tenant, instead of on a CUA worker you install. You set up five things in your tenant, then paste four ids into ATP360. ATP360 stores no secret: it signs in to your tenant with its own managed identity.
ATP360 has two kinds of CUA worker. A WorkspaceDNA Worker is a physical or virtual machine you manage, with the WorkspaceDNA agent installed and paired to your workspace. A Windows 365 for Agents worker is a Cloud PC from an agent pool in your own tenant. This article covers the second kind.
Note: Windows 365 for Agents is available only on deployments you host in your own Azure subscription (PaaS). WorkspaceDNA-hosted (SaaS) workspaces do not show the option. There is one Windows 365 for Agents connection per workspace. An Admin sets it up; once connected, it is available to all users in the workspace.
How it fits together
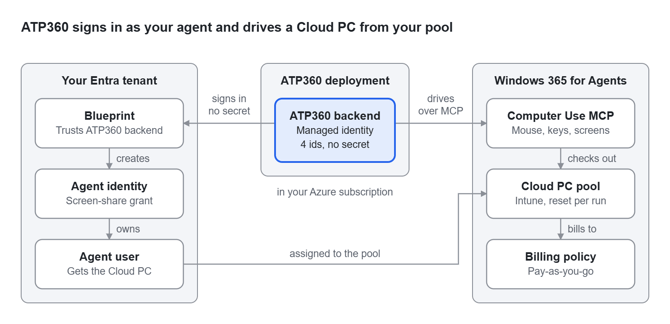
Figure 1 — How ATP360 reaches a Cloud PC in your tenant
ATP360's backend signs in through your blueprint with its managed identity and gets a token for your agent user. Microsoft's Computer Use MCP server then checks out a Cloud PC from the pool that agent user is assigned to, and ATP360 drives it with mouse, keyboard and screenshots.
Who owns what
You own the pool, the identities and the bill. ATP360 holds only four ids.
| Item | Lives in | Owned and paid by |
|---|---|---|
| Billing policy with Windows 365 for Agents pay-as-you-go | Microsoft 365 admin center, linked to your Azure subscription | You |
| Cloud PC agent pool (an Intune provisioning policy for agents) | Your Intune tenant | You: always-available Cloud PCs per month plus session time (pricing) |
| Agent identity blueprint, agent identity, agent user | Microsoft Entra Agent ID in your tenant | You |
| Federated credential on the blueprint | Your blueprint, pointing at the ATP360 backend's managed identity | You |
| Tenant id, blueprint client id, agent identity client id, agent user object id | The ATP360 deployment's settings | ATP360 stores them; no secret |
| Model tokens for the test run | Your ATP360 AI connection | Same as any other ATP360 run |
Before you start
Your tenant needs three things, per Microsoft's prerequisites for a provisioning policy (agents):
- a Microsoft Intune licence,
- an Agent 365 licence,
- an active Windows 365 for Agents billing plan (step 1).
Line up these admin roles before you start. Microsoft requires them, which is why ATP360 cannot do the setup for you.
| Step | Role needed |
|---|---|
| 1. Billing policy | Whoever manages billing in the Microsoft 365 admin center |
| 2. Blueprint and agent identity with the CLI | Agent ID Developer (or Agent ID Administrator) plus Azure Contributor |
| 2. Agent user | Global Administrator (Graph Explorer with delegated AgentIdUser.ReadWrite.All) |
| 2. The two permission grants | Global Administrator. A lesser role completes the rest and gets printed consent steps for a Global Administrator |
| 3. Agent pool | Whoever manages provisioning policies in the Intune admin center |
| 4. Federated credential | Agent ID Developer (or Agent ID Administrator), plus read access to the ATP360 resource group |
| 5. Connect | Admin role in ATP360 |
Tip: With the setup script WorkspaceDNA can provide (see step 2), one Global Administrator with read access to the ATP360 resource group covers steps 2 and 4.
Step 1: Billing policy
Create a billing policy that has Windows 365 for Agents pay-as-you-go turned on. The pool in step 3 bills through it.
- In the Microsoft 365 admin center go to Copilot > Cost management and select classic Billing & usage.
- Under Billing policies choose Add a billing policy, or open an existing one. Give it a name, an Azure subscription, a resource group and a region. Pick the region that matches the geography you will provision Cloud PCs in; the mapping is on Set up billing for Windows 365 for Agents.
- Under Billing & usage go to Pay-as-you-go services and enable Windows 365 for Agents for that policy.
Important: If Windows 365 for Agents is later disabled on the policy, every Cloud PC checkout fails. The pool must then be linked to an active policy and reprovisioned.
Step 2: Identities and permissions
Windows 365 for Agents hands a Cloud PC to an agent user. The agent user belongs to an agent identity, and the agent identity is created from an agent identity blueprint. ATP360 needs all three, plus two permission grants.
Note: Why this step needs your admin. Microsoft lets only an administrator of your own tenant create these objects. The permission grants need a Global Administrator, and the identities need an Agent ID role. ATP360 has no rights in your tenant, so it cannot do this for you. Microsoft also offers no portal page for the agent user or the permission grants, only its command-line tool and Microsoft Graph.
Tip: Prefer one script? On request, WorkspaceDNA can provide a setup script that does all of step 2 and step 4 in one run from Azure Cloud Shell and prints the four ids for step 5. Email technicalsupport@workspacedna.com.
Important: Once per tenant: the Agent 365 Tools service principal. The permission grants in 2c point at a Microsoft service principal that does not exist in a tenant until someone creates it. A Global Administrator downloads New-Agent365ToolsServicePrincipalProdPublic.ps1 from Microsoft's Agent365-devTools repository and runs it in an elevated PowerShell.
a365 setup requirementsreports whether this is done. Without it, 2c fails.
Then create the parts below by following Microsoft's guides. The right-hand column is what ATP360 needs that the guides leave open.
| Part | Microsoft guide | What ATP360 needs |
|---|---|---|
| 2a. Blueprint and agent identity | Quickest: Agent 365 CLI setup (a365 setup all). By hand: Create an agent identity blueprint and Create agent identities |
The agent must be registered in Agent 365 (Register an agent). a365 setup all does this; without it the agent is missing from Intune's Add Agents list in step 3 |
| 2b. Agent user | Agent's user account and the agentUser resource | a365 setup all does not create it. Its parent (identityParentId) is the agent identity's Object ID, not its client id |
| 2c. Computer Use MCP permission | Agent 365 CLI develop (add-mcp-servers) and Agent 365 CLI setup (setup permissions mcp) |
Server mcp_W365ComputerUse. Needs a Global Administrator. Without it, Connect fails its third check |
| 2d. Screen share | Create oauth2PermissionGrant | Resource app 90ecec28-f5a6-42b3-9bde-dae1ca98f8b5, scopes Computer.See Computer.Control, consent for all principals. The grant goes on the agent identity's service principal, not the blueprint's; on the blueprint, Connect's second check fails with AADSTS65001. If the tenant has no service principal for that app yet, create it first |
Copy these values for step 5:
| ATP360 field | Where to find it |
|---|---|
| Tenant id | Prefilled by ATP360 with the tenant it is deployed in; also Entra ID > Overview > Tenant ID |
| Blueprint client id | The blueprint's Application (client) ID |
| Agent identity client id | The agent identity's Application (client) ID |
| Agent user object id | The agent user's Object ID under Entra ID > Users |
Step 3: Cloud PC agent pool
The pool is an Intune provisioning policy for agents. Its size sets how many ATP360 tests can run on Cloud PCs at the same time.
- In the Microsoft Intune admin center go to Devices > Provision Cloud PCs > Provisioning policies (Agents) > Create policy.
- General: a name, the Billing plan from step 1, the Always available Cloud PCs count (1 to 200) and the Geography. Each Cloud PC runs one test at a time and is billed monthly whether or not it is used.
- Agents: select Add Agents and pick the ATP360 agent from step 2. This assigns the agent user to the pool. An agent user that is not on a pool cannot check out a Cloud PC.
- Image: the application under test must already be on the Cloud PC, because the machine is reset after every session. Use either a Custom image that contains it, uploaded through Intune's Add device images, or a Gallery image plus a Windows Autopilot Device Preparation Profile under Device grouping and preparation that installs it during enrolment.
- Configuration: language, region, and the device preparation above.
- Review + create.
Provisioning takes 20 to 30 minutes. The Cloud PCs then appear under Devices > All devices, and the policy's Session Usage shows how many sessions are free.
Step 4: Federated credential for ATP360
Note: If you used the WorkspaceDNA setup script in step 2, it already did this step.
This step lets ATP360 act as your blueprint without a secret. You add the ATP360 backend's managed identity to the blueprint as a federated identity credential. Microsoft recommends a managed identity as the production credential for a blueprint; client secrets are for local development.
- Find the managed identity. In the Azure portal, open the resource group your ATP360 managed application was deployed into. Open the user-assigned managed identity named
atp360backend-id-<hash>and copy its Object (principal) ID. The same value is the deployment outputbackendManagedIdentityPrincipalId.
az identity list \
  --resource-group <your-atp360-resource-group> \
  --query "[?starts_with(name,'atp360backend-id')].{name:name, principalId:principalId}" \
--output table| Field | Value |
|---|---|
| Issuer | https://login.microsoftonline.com/<your tenant id>/v2.0 |
| Subject | The Object (principal) ID from 1 |
| Audience | api://AzureADTokenExchange |
In the Entra admin center: App registrations > your blueprint > Certificates & secrets > Federated credentials > Add credential > Other issuer. Or with Microsoft Graph PowerShell:
Connect-MgGraph -Scopes "AgentIdentityBlueprint.AddRemoveCreds.All" -TenantId <your tenant id>
New-MgApplicationFederatedIdentityCredential -ApplicationId <blueprint client id> -BodyParameter @{
  Name      = "atp360-backend"
  Issuer    = "https://login.microsoftonline.com/<your tenant id>/v2.0"
  Subject   = "<managed identity principal id>"
  Audiences = @("api://AzureADTokenExchange")
}
Step 5: Connect in ATP360
- In ATP360 open Settings > CUA Workers > Add a CUA Worker.
- Choose Windows 365 for Agents rather than WorkspaceDNA Worker. The Connect Windows 365 for Agents Provisioning Policy form opens.
- Check the Tenant id, which ATP360 fills in with the tenant it is deployed in, then paste the Blueprint client id, Agent identity client id and Agent user object id from step 2. Hover the ? next to each field for where to find it.
- Select Connect. Clear empties the form.
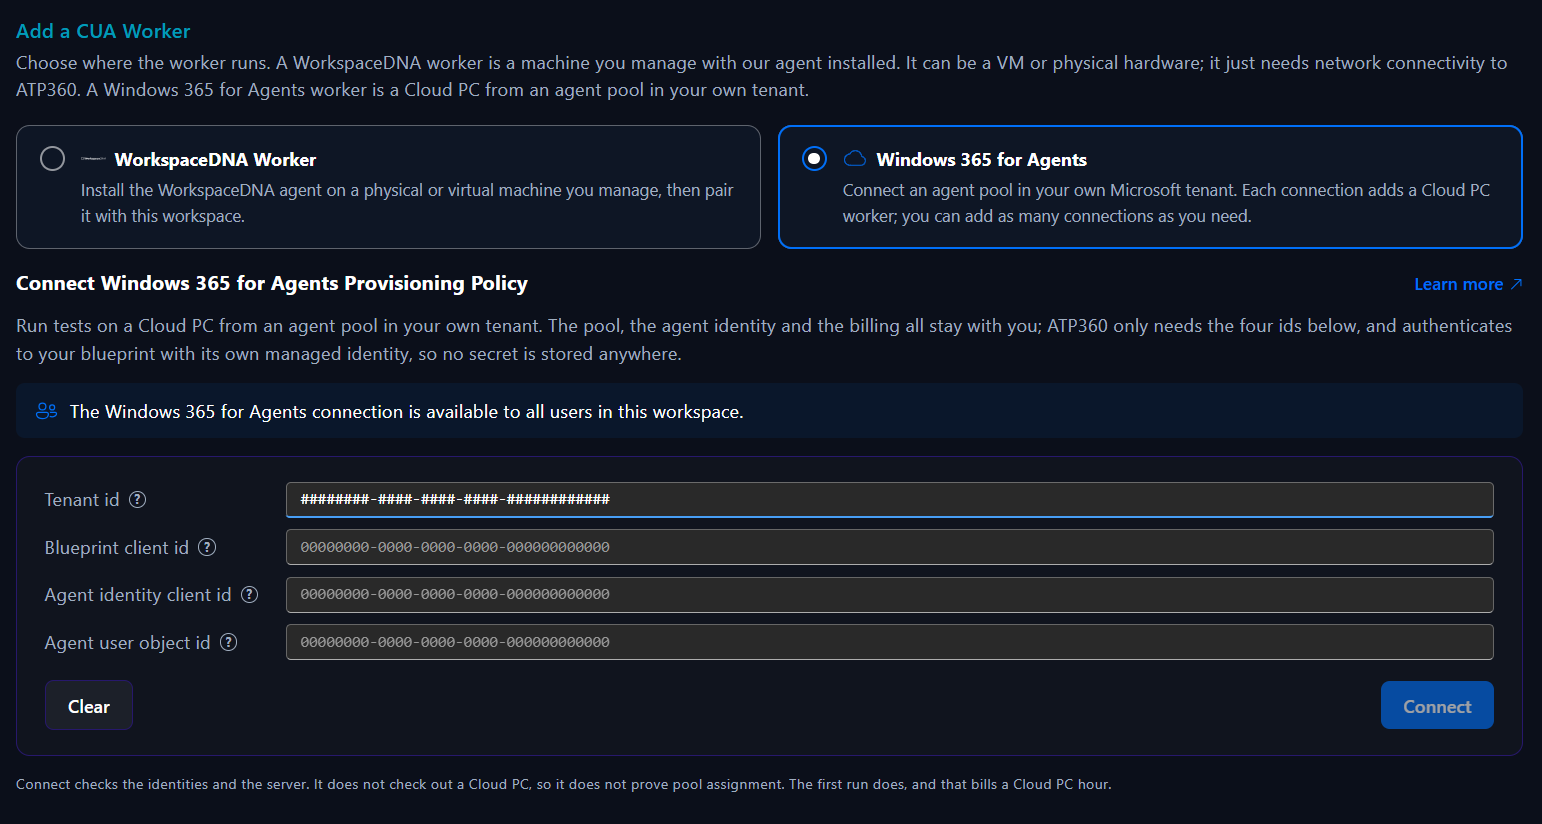
Figure 2 — Add a CUA Worker, with Windows 365 for Agents selected
ATP360 runs three checks, stops at the first failure, and stores the ids only when all three pass.
| Check | What it proves | If it fails, redo |
|---|---|---|
AgentUserToken |
Your blueprint accepts the ATP360 managed identity, and blueprint, agent identity and agent user chain to a token for the Computer Use MCP server | Step 4, then the three ids from step 2 |
ScreenShareToken |
The agent identity may see and control the Cloud PC's screen | Step 2d |
McpServer |
The Computer Use MCP server answers and lists its session tools | Step 2c |
When all three pass, the panel shows Connected and a Windows 365 for Agents card appears on Test Now. Test connection re-runs the checks with the stored ids. Disconnect clears the ids and removes the card; a run already in progress finishes on the connection it started with.
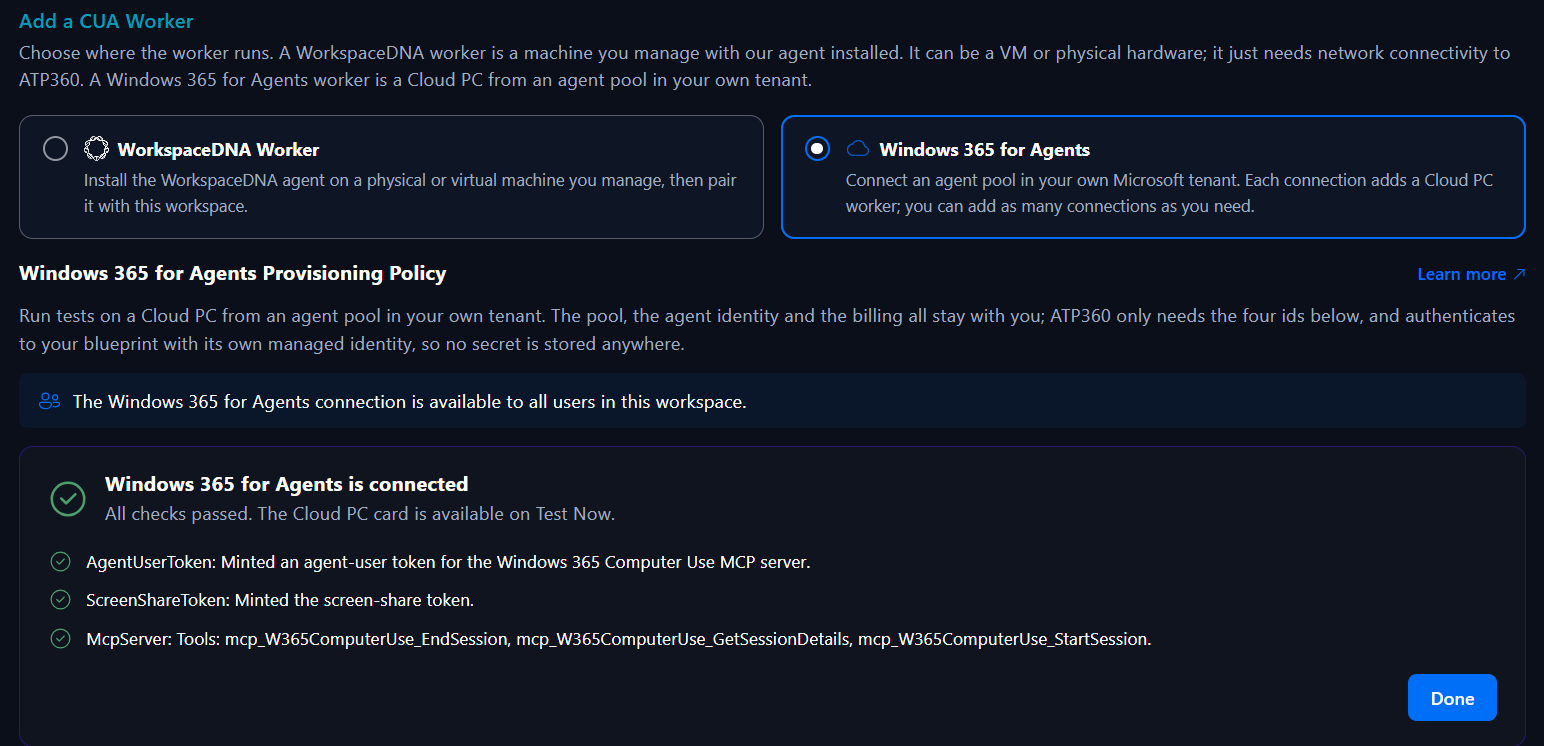
Figure 3 — The Connect panel with all three checks passed
Note: Connect does not check out a Cloud PC, because a checkout bills a Cloud PC hour. So it cannot tell whether the agent user is on a pool with a free Cloud PC (step 3). Your first run proves that: if the pool is missing or full, the run fails at checkout with Microsoft's message.
Limits to know
- The Cloud PC is reset after every session. Anything the application under test needs must come from the pool's image or be installed by Intune during enrolment. A run cannot rely on what a previous run installed.
- No modifier-held clicks and no mouse hold. Microsoft's Computer Use MCP server has no Ctrl-click and no press-and-hold, so a step that needs either cannot run on a Cloud PC. Keyboard shortcuts work.
- Long pauses keep the Cloud PC. Microsoft ends a session after 30 minutes without a request. ATP360 sends a small request every 10 minutes while a run holds its Cloud PC, so a run paused or waiting for a person keeps it.
- An ATP360 restart pauses Cloud PC runs, then resumes them. About 45 seconds after startup ATP360 reconnects to each run's session and continues from the current screen. Live screen share is not available for the rest of that run; screenshots are. A run whose session is gone is marked failed and its Cloud PC is returned to the pool.
- Runs go in parallel, one Cloud PC each, up to the pool size. A run that finds no free Cloud PC retries for about 75 seconds, then fails with a message that says so. Size Always available Cloud PCs to the number of Cloud PC runs you expect at the same time.
Microsoft references
Microsoft's pages for each part of the setup, in the order you need them.
| Microsoft page | What it covers | Step |
|---|---|---|
| Introduction to Windows 365 for Agents | What the service is | Overview |
| Pricing | Always-available Cloud PCs and session time | Overview |
| Agent 365 onboarding | The Agent 365 licence | Before you start |
| Set up billing | Billing policy, pay-as-you-go, region mapping | 1 |
| New-Agent365ToolsServicePrincipalProdPublic.ps1 | Once-per-tenant Agent 365 Tools service principal | 2 |
| Agent 365 CLI setup | a365 setup all, setup permissions mcp, required roles |
2a, 2c |
| Register an agent | Agent 365 registration | 2a |
| Create an agent identity blueprint | Blueprint in the portal, and its credentials | 2a, 4 |
| Create agent identities | Agent identity | 2a |
| Agent's user account | Agent user | 2b |
| agentUser resource | Graph call that creates the agent user | 2b |
| Agent 365 CLI develop | add-mcp-servers |
2c |
| Windows 365 for Agents MCP server | The Computer Use MCP server and its tools | 2c |
| Create oauth2PermissionGrant | The screen-share grant | 2d |
| Create a provisioning policy (agents) | Agent pool, licences, image | 3 |
| Cloud PC agent pools | How pools hand out Cloud PCs | 3 |
| Autonomous agent authentication flow | The token chain ATP360 uses with the federated credential | 4, 5 |
| Identity and security | How agents sign in to Cloud PCs | 5 |
| Agent session lifecycle | Checkout, idle timeout, reset | Limits |
Related articles
- ATP360 CUA Workers — viewing, adding and updating installed workers
- ATP360 Deployment Guide — deploying ATP360 into your own Azure subscription (PaaS)
- ATP360 Architecture, Security and Deployment Pre Requisites — managed identities, network paths and resources
- ATP360 AI Integrations — the models that drive the Cloud PC
- ATP360 Test Failure Types and Errors — what a failed run means
- ATP360 Glossary — Cloud PC, agent pool, agent identity blueprint, agent user